

To add Google AdMob ads in Visual Studio Code
Learn to integrate Google AdMob into your mobile app using Visual Studio Code. Follow this simple 9-step guide to monetize your application efficiently.
1. Create an AdMob Account
First, sign up for AdMob. Then, register your app in the AdMob console. This step generates a unique App ID. Without this ID, your app cannot connect to AdMob servers. Therefore, always begin here before touching your code.
2. Prepare Your Project
Next, open your project in Visual Studio Code. Ensure your minimum SDK version is 23 and your compile SDK version is 35. These values guarantee compatibility with the latest Google Mobile Ads SDK. Transitioning early avoids build errors later.
3. Add SDK Dependencies
Now, include the Mobile Ads SDK. In your build.gradle file, add:
implementation 'com.google.android.gms:play-services-ads:25.3.0'
Then, sync your project. This action downloads the required libraries. Without syncing, ads will fail to load.

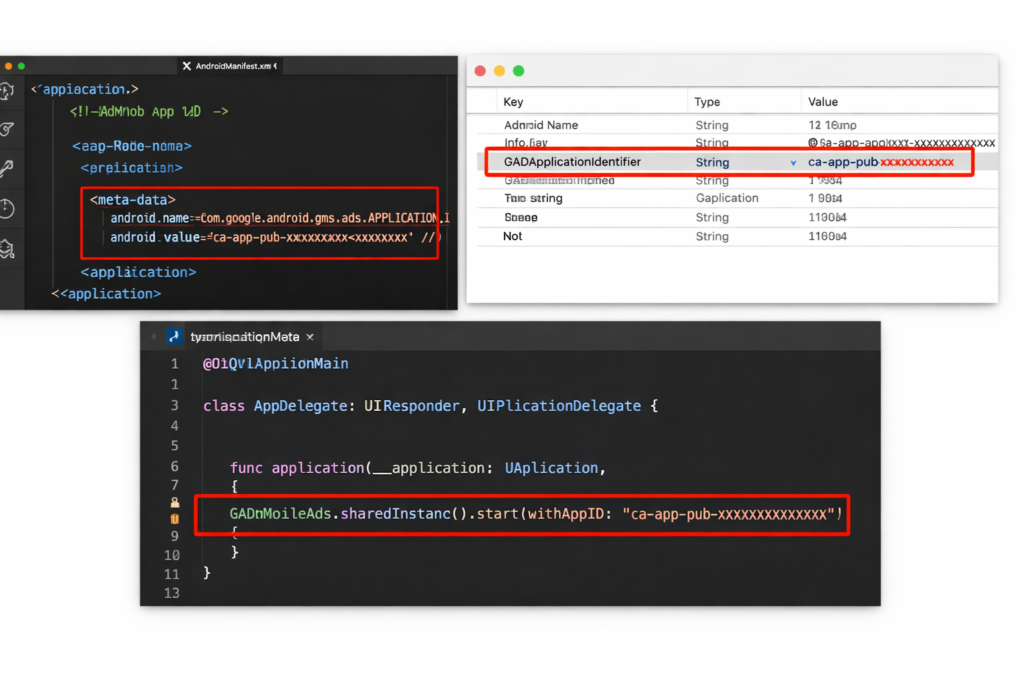
4. Configure App ID
After syncing, insert your App ID into AndroidManifest.xml. Use:
<meta-data android:name="com.google.android.gms.ads.APPLICATION_ID"
           android:value="YOUR_APP_ID"/>
This configuration links your app directly to AdMob. Missing this tag causes crashes.
5. Initialize the SDK
Next, initialize the SDK in your Application class. Use:
MobileAds.initialize(this, initializationStatus -> {});
This ensures ads can load once your app starts. Transitioning here prepares your app for ad requests.
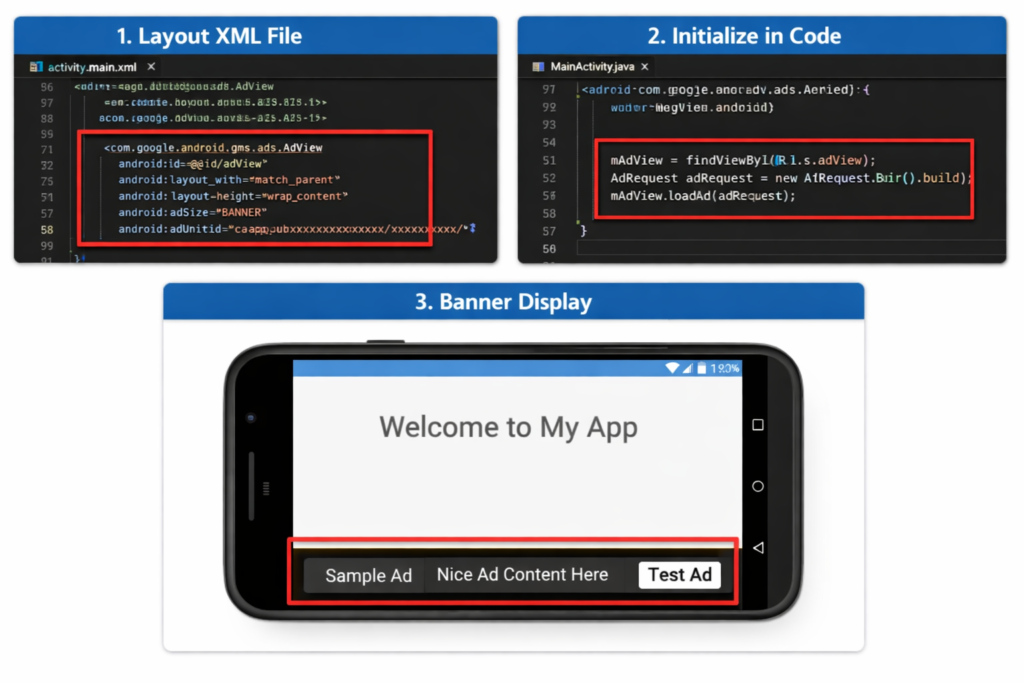
6. Add Banner Ads
To display banners, insert an AdView in your layout XML. Then, load ads with:
AdView mAdView = findViewById(R.id.adView);
AdRequest adRequest = new AdRequest.Builder().build();
mAdView.loadAd(adRequest);
Banner ads fit well at the bottom of screens.
7. Implement Interstitial Ads
Interstitial ads appear between activities. Initialize InterstitialAd and load it before showing. Display it during natural breaks, such as after a game level. This timing keeps users engaged while generating revenue.
8. Integrate Rewarded Ads
Rewarded ads give users bonuses. Use RewardedAd objects to load and show them. After completion, grant the promised reward. This creates a positive loop. Users enjoy rewards, and developers earn more.
9. Test and Deploy
Finally, test with sample ads. Replace live IDs with test IDs during development. Once verified, switch back to real IDs. Then, deploy your app. Monitoring performance in the AdMob dashboard ensures long‑term success.
✅ By following these nine steps, you can confidently integrate AdMob ads into your application using Visual Studio Code. Would you like me to also provide a visual flow diagram showing how SDK setup, configuration, and ad placement connect together?
What's your reaction?
J.RAZ
Hi, my name is Jouri. I'm a web designer, currently studying software engineering for my bachelor's degree. I started studying computer science because it's practical and because I'm good at it. But if I had the chance, I'd choose writing as a career. I build worlds and describe names simply because they sound pretty. That's why I'm here.